
Mango Sticky Rice is a beloved Thai dessert that pairs sweet, sticky rice with a rich, creamy coconut sauce and fresh, ripe mango. This dessert is both indulgent and refreshing, making it perfect for any occasion. The homemade version is easy to make and has less sugar, allowing the natural flavors of the mango and coconut to shine. Best of all, it’s gluten-free, vegetarian, and vegan!
Why You’ll Love This Recipe
-
Naturally Sweet: The sweetness comes from the mango and coconut milk, making it a wholesome treat.
-
Simple Ingredients: Just a few key ingredients—sticky rice, coconut milk, sugar, and mango—combine to create a satisfying dessert.
-
Versatile: Enjoy it as a light dessert or as part of a larger meal. It’s also easy to make in advance!
-
Gluten-Free & Vegan: This dessert is both gluten-free and vegan, making it a great option for a variety of diets.
-
Coconut Goodness: The creamy coconut sauce enhances the sticky rice, giving it a luscious, tropical flavor.

Ingredients
(Tip: You’ll find the full list of ingredients and measurements in the recipe card below.)
-
1 cup uncooked sticky rice
-
1 can full-fat coconut milk (13.5 oz / 400 g can)
-
¼ cup sugar
-
½ teaspoon salt
-
2 teaspoons cornstarch (optional)
-
3 ripe mangoes, peeled and sliced
-
Toasted sesame seeds for garnish (optional)
Directions
-
Soak the Rice: Rinse the sticky rice with tap water, stirring gently with your hand to remove excess starch. Drain the water, then repeat the process once more. Add cold water to cover the rice and soak it for a minimum of 1 hour, or overnight in the fridge. Once soaked, rinse again and drain.
-
Steam the Rice: Transfer the rice to a heatproof bowl and add about 2 inches of water to your steamer (the water should not touch the rice). Place the rice bowl on the steaming rack and cover the steamer. Bring the water to a boil over medium-high heat. Once steam begins to come out, turn the heat to medium and steam for 20–25 minutes, until the rice is fully cooked. Remove from the heat and let it sit, covered, while you prepare the coconut sauce.
-
Make the Coconut Sauce: In a saucepan, combine the coconut milk, sugar, and salt. Cook over medium to medium-low heat until the sugar is dissolved and the mixture is warm. Do not let the sauce boil.
-
Optional – Thicken the Sauce: If the coconut milk is thin, mix the cornstarch with 4 tablespoons of water in a small bowl until dissolved. Add half of the slurry to the sauce and stir to thicken. You can add more slurry or water as needed to reach a consistency that coats the back of a spoon.
-
Combine Rice and Sauce: Carefully remove the rice from the steamer. Pour 1 cup of the coconut sauce over the rice and stir until the sauce is fully absorbed. Let the rice mixture cool to room temperature or until it reaches a lukewarm temperature.
-
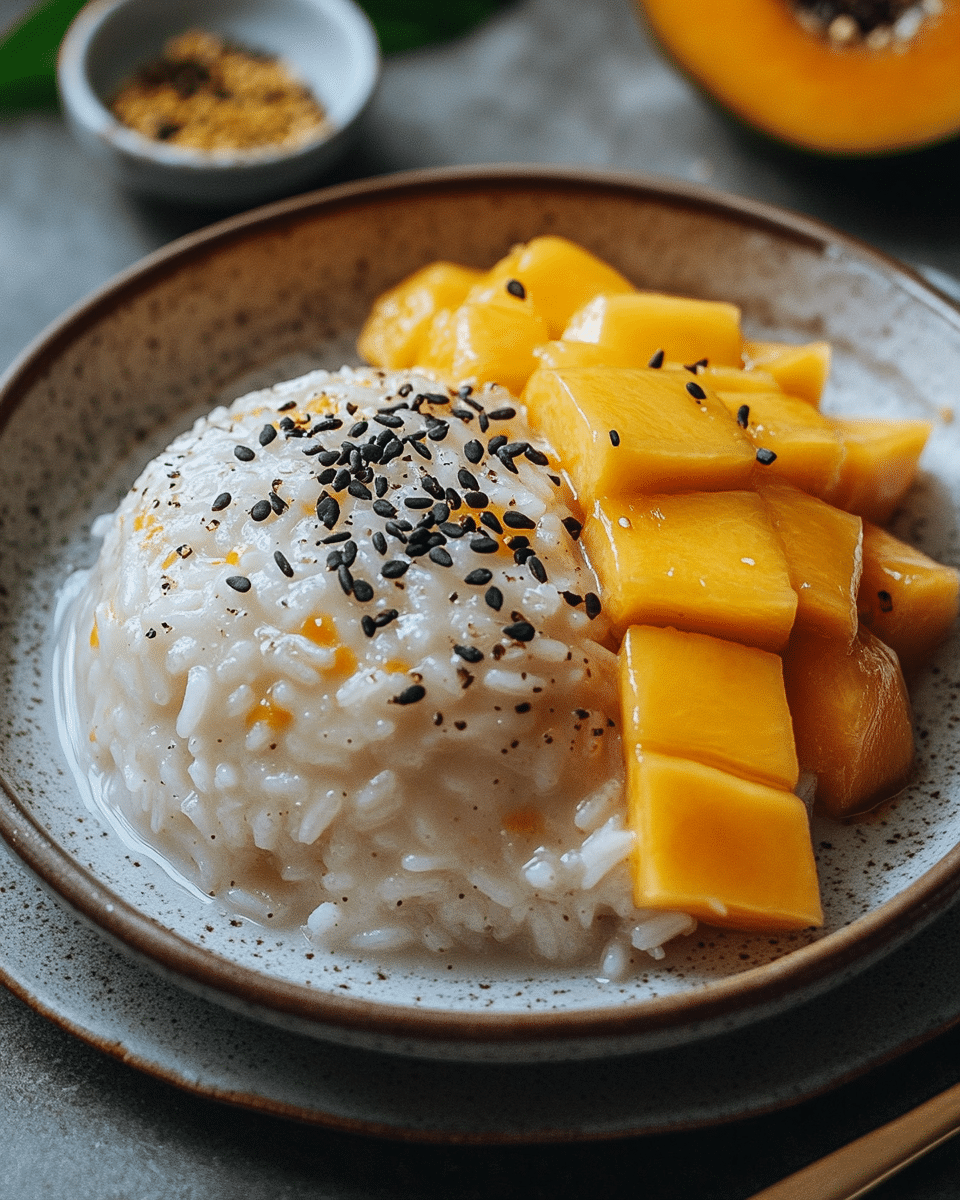
Assemble and Serve: Scoop about ⅓ cup of the coconut sticky rice into small serving bowls or plates. Arrange the sliced mango on the side. Drizzle additional coconut sauce over the rice, and garnish with toasted sesame seeds, if desired. Serve and enjoy!
Servings and Timing
-
Servings: 4-6 servings
-
Prep time: 10 minutes
-
Cook time: 30 minutes
-
Pre-soak time: 1 hour (or up to overnight)
-
Total time: 1 hour 40 minutes
Variations
-
Sweeteners: If you prefer a lighter option, you can substitute sugar with maple syrup, coconut sugar, or agave nectar.
-
Fruit Options: Try adding other tropical fruits like dragon fruit, pineapple, or papaya for a colorful twist.
-
Topping Ideas: Garnish with toasted coconut flakes, crushed peanuts, or a drizzle of condensed milk for extra richness.
-
Non-Coconut Version: You can use almond milk or another non-dairy milk if you don’t want the coconut flavor.
Storage/Reheating
-
To store: Keep the mango sticky rice in an airtight container in the refrigerator for up to 2 days.
-
To freeze: While freezing is not ideal due to the rice texture, you can freeze the sticky rice and coconut sauce separately. Thaw and reheat before serving, though the texture may change slightly.
-
To reheat: Reheat the rice in a steamer or microwave, covered with a damp towel to keep it moist. Warm the coconut sauce separately.
FAQs
Can I use regular rice instead of sticky rice?
Sticky rice is essential for this dessert’s texture, as it becomes soft and gooey. Regular rice won’t give the same result, so it’s best to use glutinous or sticky rice.
How do I know when the rice is done?
The rice should be tender with no raw bits in the center. It will have a slightly sticky and chewy texture when fully cooked.
Can I make the rice ahead of time?
Yes! You can prepare the rice in advance and keep it in the refrigerator until ready to serve. Just warm it slightly before adding the coconut sauce.
What can I use instead of cornstarch to thicken the sauce?
You can use arrowroot powder or even a bit of rice flour as a substitute for cornstarch.
Can I use canned mango or mango puree?
While fresh mango is ideal for this dessert, canned or pureed mango can work in a pinch. However, the fresh slices will provide a better texture and flavor contrast to the sticky rice.
How do I make this dessert more decadent?
Drizzle some sweetened condensed milk over the sticky rice and mango, or serve with a dollop of coconut whipped cream for an extra indulgent touch.
How long can I store leftover mango sticky rice?
Leftovers can be stored in an airtight container in the fridge for up to 2 days, but the mango may soften and lose its texture over time.
Is this dessert gluten-free?
Yes, mango sticky rice is naturally gluten-free, making it a great option for those with gluten sensitivities.
Can I make this dessert without the coconut sauce?
The coconut sauce is essential to the flavor of mango sticky rice, but if you’re allergic to coconut, you can try substituting with almond milk or another non-dairy option.
What type of coconut milk should I use?
Use full-fat coconut milk for the richest, creamiest texture. Light coconut milk will be thinner and may not provide the same richness.
Conclusion
Mango Sticky Rice is a simple yet delicious dessert that offers the perfect balance of sweetness and texture. With its soft, sticky rice, creamy coconut sauce, and fresh mango, it’s a refreshing and satisfying treat that’s perfect for any occasion. Plus, it’s easy to make and can be adjusted to suit your tastes. Enjoy this classic Thai dessert with family and friends!
Print
Mango Sticky Rice
- Total Time: 20 minutes
- Yield: 8 rolls
- Diet: Gluten Free
Description
These Thai Basil Beef Rolls are a quick and delicious dish that combines savory ground beef with fresh, vibrant herbs and crunchy vegetables, all wrapped in a warm tortilla. Ready in just 20 minutes, they’re perfect for busy weeknights or a fun appetizer for gatherings.
Ingredients
- 1 ½ pounds ground beef (or chicken)
- Black pepper to taste
- 4 cloves garlic, chopped
- 1 tablespoon fresh grated ginger (or ¼ cup candied ginger)
- 1-3 teaspoons Chinese 5 spice
- ⅓ cup tamari or soy sauce
- ¼ cup Thai chili sauce (homemade, see notes)
- ¼ cup chopped green onions
- 4 Persian cucumbers, chopped
- 2 cups cilantro, chopped
- ½ cup Thai basil, chopped
- ⅓ cup chopped roasted peanuts
- 8-10 flour tortillas, warmed
- Chili paste, for serving
- Toasted sesame oil, for serving
Instructions
- Cook the Beef: In a large skillet, cook the ground beef with black pepper over medium heat. Break up the meat as it cooks until browned, about 5 minutes. Add the garlic, ginger, and Chinese five-spice. Cook for an additional minute until fragrant.
- Add Sauce and Simmer: Stir in the tamari (or soy sauce) and Thai chili sauce. Bring the mixture to a simmer and cook for 3-5 minutes until the sauce coats the beef. Stir in 2 tablespoons of chopped green onions and remove from heat.
- Prepare the Tortillas: Place one tortilla at a time in the microwave for 15 seconds to warm it up.
- Assemble the Rolls: Spoon the beef mixture down the center of each tortilla. Top with cucumber, cilantro, Thai basil, green onions, and chopped peanuts. Fold the bottom of the tortilla over the filling, then fold in the sides and ends, and roll forward to secure the filling.
- Serve: Repeat with the remaining tortillas and filling. Serve the rolls warm with extra soy sauce, chili paste, and toasted sesame oil for dipping. You can also serve these with rice for a complete meal.
Notes
- Vegetarian Option: Swap the ground beef for tofu or tempeh for a plant-based alternative.
- Spicy Adjustment: Increase the amount of chili paste or add fresh chopped chilies for more heat.
- Rice Paper Rolls: Instead of tortillas, use rice paper for a lighter, gluten-free option.
- Crunchy Additions: Add shredded carrots or cabbage for extra crunch and freshness.
- Herb Substitution: If you can’t find Thai basil, regular basil or mint can be used as a substitute.
- Prep Time: 9 minutes
- Cook Time: 11 minutes
- Category: Appetizer
- Method: Stovetop
- Cuisine: Thai
Nutrition
- Serving Size: 1 roll
- Calories: 220
- Sugar: 3g
- Sodium: 540mg
- Fat: 11g
- Saturated Fat: 2g
- Unsaturated Fat: 9g
- Trans Fat: 0g
- Carbohydrates: 17g
- Fiber: 2g
- Protein: 14g
- Cholesterol: 40mg


